
How to stream on Twitch with OBS: step-by-step setup
For your first gaming stream, start with 1920 × 1080, 60 FPS and 6000 kbps. Connect Twitch, add your game and microphone, check a short recording, then go live. The guide also includes a 936p option for fast-moving games.
This guide covers Windows. You need a Twitch account, a computer with an internet connection, a microphone or headset, and headphones. Screenshots show the Ukrainian interfaces of Twitch and OBS 32.2.2; the text gives the English field names.
This profile needs an available H.264 encoder and a stable upload speed of roughly 9 Mbps or more. Upload is the speed used to send data. This starting estimate leaves room for audio and other traffic; check the connection during your broadcast.
This guide covers Windows. You need a Twitch account, a computer with an internet connection, a microphone or headset, and headphones. Screenshots show the Ukrainian interfaces of Twitch and OBS 32.2.2; the text gives the English field names.
This profile needs an available H.264 encoder and a stable upload speed of roughly 9 Mbps or more. Upload is the speed used to send data. This starting estimate leaves room for audio and other traffic; check the connection during your broadcast.
1. Connecting Twitch to OBS
- Download and install OBS Studio from the official website.
- Click Settings in OBS’s bottom-right controls and open Stream. Set Service to Twitch.
- Click Connect Account (recommended) and sign in to Twitch. Check the channel name before approving access. This method does not require copying your stream key. Click Apply → OK.
- For the manual profile in this guide, turn Enhanced Broadcasting off if its switch is available. It controls the delivery of multiple quality versions, which needs a separate setup. Twitch guide.
If the Auto-Configuration Wizard opens on first launch, close it and enter the settings in this guide.
Enable Twitch two-factor authentication to protect your account.
Enable Twitch two-factor authentication to protect your account.
2. Game capture
A scene defines what viewers see. Its sources supply the picture and sound.
- Launch your game. In Scenes, select the default scene or click + to create one and name it “Game”.
- In Sources, click + → Game Capture and confirm the new source.
- Set Mode to Capture specific window, then select your running game in Window. Click OK.
- Select the source in the list and press Ctrl+F to fit it to the frame.
On a single monitor, a fullscreen game may stop appearing in the preview after Alt+Tab. Return to the game and check a short recording before changing the capture setup. Game Capture modes, source positioning.
With Display Capture, viewers see the entire selected display, including other windows and notifications. Close private conversations before going live.
With Display Capture, viewers see the entire selected display, including other windows and notifications. Close private conversations before going live.
3. Microphone and game audio
Open Settings → Audio and fill in these fields:
- Sample Rate — 48 kHz
- Channels — Stereo
- Desktop Audio, Desktop Audio 2 — Disabled; we will capture the game separately below
- Mic/Auxiliary Audio — Your microphone or headset microphone
- Additional Mic/Aux devices — Disabled unless you use extra devices
Select your microphone by name under Global Audio Devices. Default depends on the default device in Windows. Click Apply → OK.
Game audio only
In Sources, double-click Game Capture. Below Window, enable Capture Audio (BETA) and click OK. This requires OBS 30.1+ and Windows 10 version 2004+ or Windows 11.
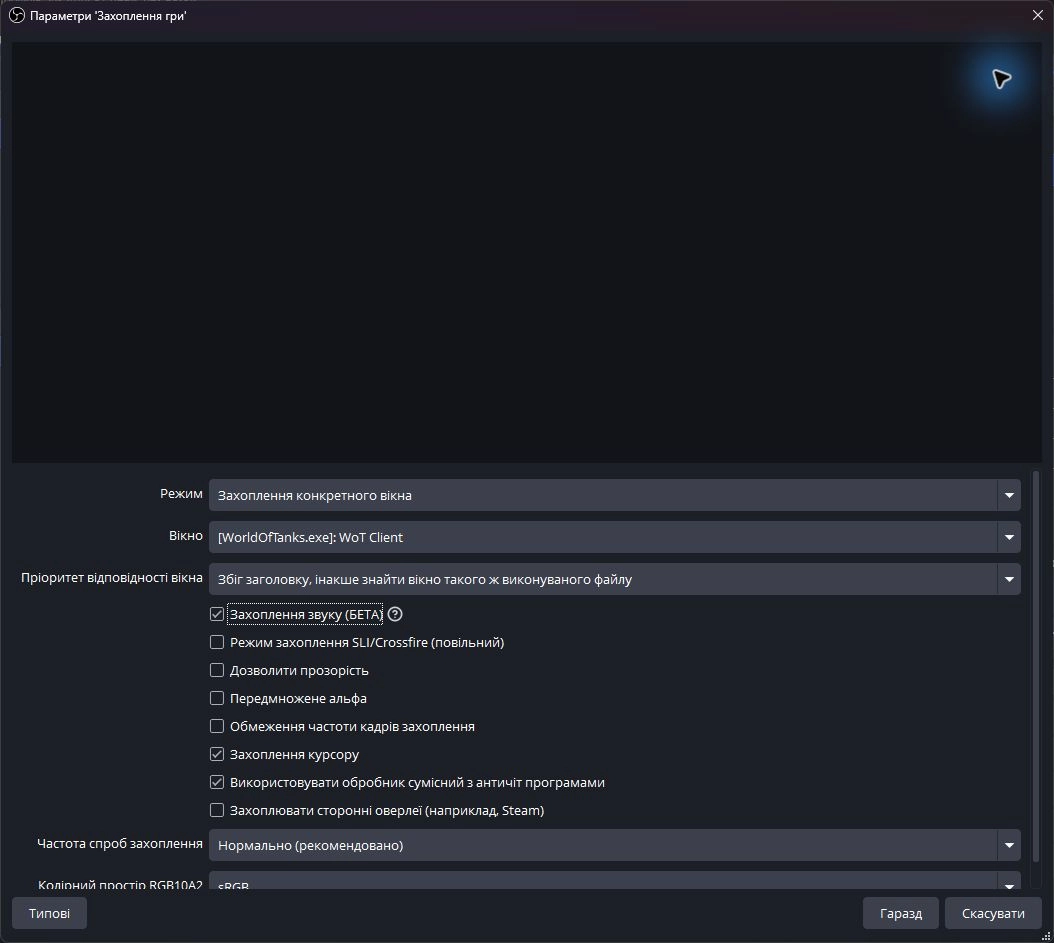
Capture Audio (BETA) is enabled. Select your game in Window. Keep global Desktop Audio disabled when capturing the game separately. Click the screenshot to enlarge it and read the fields.
If it does not capture sound, disable the checkbox and try Sources → + → Application Audio Capture (BETA), selecting the game window. Use one capture method to avoid duplicate sound. OBS guide.
This route leaves browser and Discord audio out of the stream. To include friends speaking in Discord, add it as a separate application audio source.
Look at the Audio Mixer. Speaking should move the microphone meter; game sounds should move the game source meter. Check the mute buttons. If you added the microphone through Audio Input Capture, disable its duplicate in Global Audio Devices.
This route leaves browser and Discord audio out of the stream. To include friends speaking in Discord, add it as a separate application audio source.
Look at the Audio Mixer. Speaking should move the microphone meter; game sounds should move the game source meter. Check the mute buttons. If you added the microphone through Audio Input Capture, disable its duplicate in Global Audio Devices.
Microphone volume
Speak from your usual distance. Start with voice peaks around −12 to −6 dB. If the sound distorts, reduce input gain on the microphone, audio interface or in Windows: the OBS fader cannot repair an already distorted signal. Lower the game volume until your words remain clear over it. Check the result in a recording. OBS mixer guide.
4. Stream quality: 1080p / 60 FPS
This profile sends 1080p / 60 FPS. The main values are collected in one list; choose the settings for your GPU below.
Quick settings: 1080p / 60 FPS
- Settings → Video: Output (Scaled) Resolution — 1920 × 1080, Common FPS Values — 60.
- Settings → Output → Streaming: H.264, Rate Control — CBR, Bitrate — 6000 Kbps, Keyframe Interval — 2 s.
- Streaming: Rescale Output — Disabled, Audio Track — 1, Audio Encoder — AAC, if selectable.
- Settings → Audio: Sample Rate — 48 kHz, Channels — Stereo.
- Settings → Output → Audio: set Audio Bitrate — 160 Kbps for Track 1.
Video: canvas and output size. Open Settings → Video. Base (Canvas) Resolution is your working canvas in OBS; Output (Scaled) Resolution is the picture sent to Twitch.
For a Full HD game, set both fields to 1920 × 1080. If you play at 1440p, keep Base at 2560 × 1440 and set Output to 1920 × 1080. When scaling down, select Downscale Filter — Lanczos, 36 samples; the filter does not apply when Base and Output match.
Set Common FPS Values to 60 and click Apply → OK. Check the game preview. After changing the canvas, press Ctrl+F on the game source if you need to fit the picture.
For a Full HD game, set both fields to 1920 × 1080. If you play at 1440p, keep Base at 2560 × 1440 and set Output to 1920 × 1080. When scaling down, select Downscale Filter — Lanczos, 36 samples; the filter does not apply when Base and Output match.
Set Common FPS Values to 60 and click Apply → OK. Check the game preview. After changing the canvas, press Ctrl+F on the game source if you need to fit the picture.
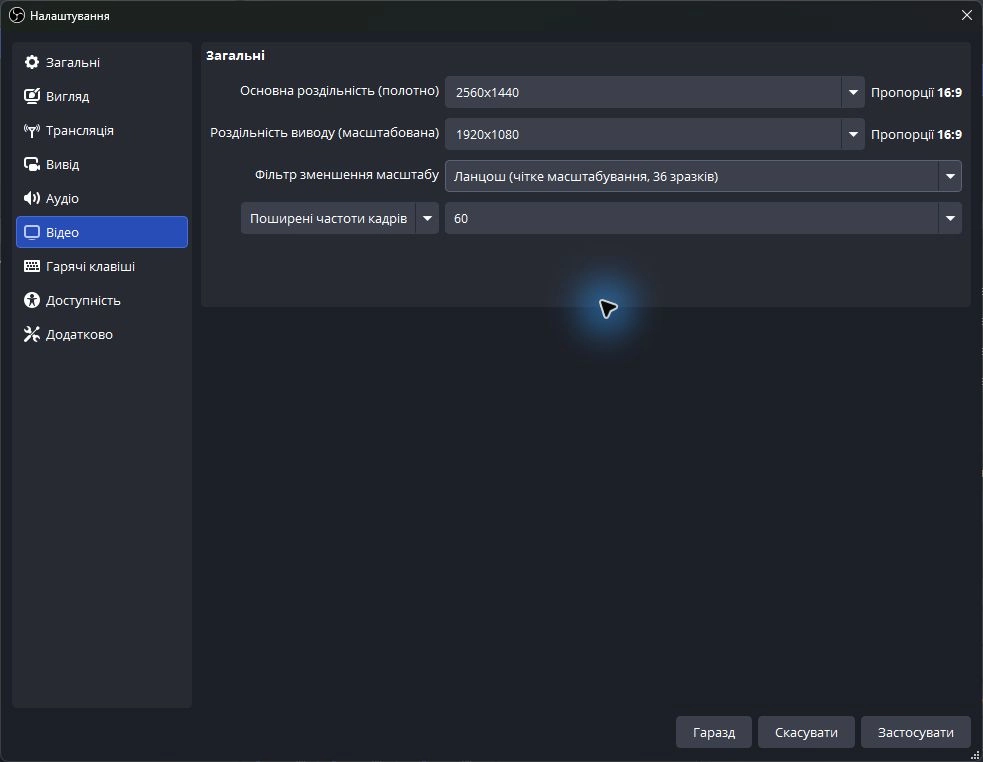
Example for a 1440p display: Base is 2560×1440 and Output is 1920×1080. For a Full HD game, set both fields to 1920×1080.
Streaming: shared settings
Open Settings → Output, set Output Mode: Advanced and select the Streaming tab. Use these values for every encoder in this profile:
- Rate Control — CBR
- Bitrate — 6000 Kbps
- Keyframe Interval — 2 s
- Rescale Output — Disabled; Video already sets the output size
- Audio Track — 1
- Audio Encoder, if selectable — AAC, such as FFmpeg AAC
Choosing an encoder. In Video Encoder, choose one option from the list below. If you have a dedicated NVIDIA or AMD GPU, start with its hardware H.264 encoder.
To find your GPU model in Windows, press Ctrl+Shift+Esc → Performance → GPU. The panel shows its name. Encoder names may vary slightly in OBS; availability depends on the GPU model and driver. OBS hardware encoders.
After selecting the encoder, check the shared settings against the list above.
To find your GPU model in Windows, press Ctrl+Shift+Esc → Performance → GPU. The panel shows its name. Encoder names may vary slightly in OBS; availability depends on the GPU model and driver. OBS hardware encoders.
After selecting the encoder, check the shared settings against the list above.
- Compatible NVIDIA GPU — NVIDIA NVENC H.264
- Compatible AMD GPU — AMD HW H.264 (AVC); the AMF hardware encoder
- Available Intel graphics with Quick Sync — QuickSync H.264; the QSV encoder
- No hardware H.264 option in the list — x264; encoding on the CPU
Next, follow only the block for your encoder: NVIDIA or AMD / Intel / x264. You can skip the other encoders’ settings.
If you see Twitch VOD Track, leave it off: this profile sends your voice and game on track 1 for both the live broadcast and VOD.
If you see Twitch VOD Track, leave it off: this profile sends your voice and game on track 1 for both the live broadcast and VOD.
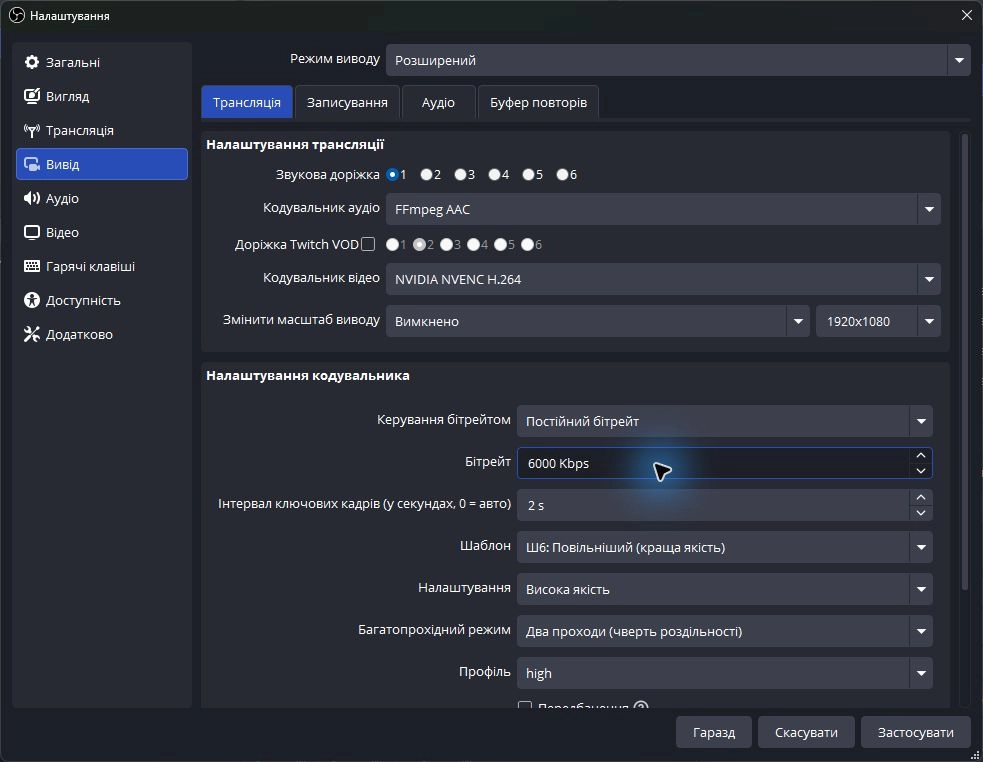
Output Mode is Advanced («Розширений»), on the Streaming («Трансляція») tab. Rescale Output is disabled; Video sets the frame size.
NVIDIA NVENC H.264
If you selected NVIDIA NVENC H.264, enter these values on the same Streaming tab:
If you selected NVIDIA NVENC H.264, enter these values on the same Streaming tab:
- Preset — P6: Slower (Better Quality)
- Tuning — High Quality
- Multipass Mode — Two Passes (Quarter Resolution)
- Profile — high
- Look-ahead — Off
- Adaptive Quantization — On; called Psycho Visual Tuning in older versions
- B-Frames / Max B-Frames — 2
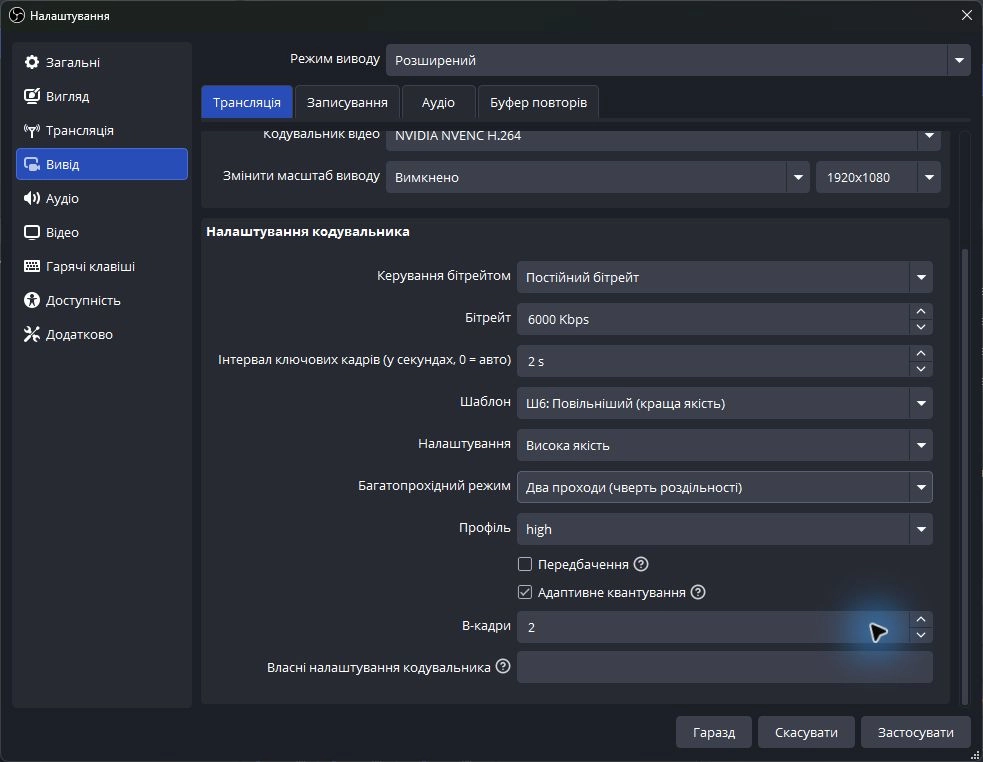
Scroll down on Streaming. Look-ahead is labelled «Передбачення» and Adaptive Quantization is «Адаптивне квантування».
Leave Look-ahead off to avoid adding GPU load. See the explanation in NVIDIA’s guide. In OBS 31+, Adaptive Quantization is the new name for Psycho Visual Tuning.
AMD, Intel or x264
If you selected one of these encoders, use its entry in the list:
AMD, Intel or x264
If you selected one of these encoders, use its entry in the list:
- AMD H.264 — Preset: Quality, Profile: high
- Intel QuickSync H.264 — Target Usage: TU4 (Balanced), Profile: high, Latency: Normal, if shown
- x264 — CPU Usage Preset: veryfast, Profile: high, Tune: None
Leave these encoders’ extra settings at their defaults. If x264 overloads your CPU, check whether a hardware H.264 encoder is available.
Output → Audio: audio bitrate
In Settings → Output → Audio, set Audio Bitrate: 160 Kbps for Track 1. Click Apply → OK.
In the main window, open Edit → Advanced Audio Properties and select track 1 for the microphone and game audio. Leave Audio Monitoring on Monitor Off: the audio reaches the broadcast, and OBS does not duplicate it in your headphones.
In the main window, open Edit → Advanced Audio Properties and select track 1 for the microphone and game audio. Leave Audio Monitoring on Monitor Off: the audio reaches the broadcast, and OBS does not duplicate it in your headphones.
1080p or 936p: which to choose
- 1080p (Full HD): 1920 × 1080, 60 FPS, 6000 Kbps. Start with this profile and check text readability and detail.
- 936p: 1664 × 936, 60 FPS, 6000 Kbps. Try it if 1080p shows blocks or smearing during movement.
936p means 1664 × 936 at a 16:9 aspect ratio. Its frame contains roughly 25% fewer pixels than Full HD. At the same bitrate, this may reduce compression artifacts during fast camera turns, racing and shooter gameplay. Small text may lose sharpness. Compare both options using the same moving scene.
To enable 936p, open Settings → Video and type 1664 × 936 into Output (Scaled) Resolution. Keep Base at your game resolution, Common FPS Values: 60 and Downscale Filter: Lanczos, 36 samples. In Streaming, keep CBR and 6000 Kbps, with Rescale Output Disabled. Click Apply → OK.
To enable 936p, open Settings → Video and type 1664 × 936 into Output (Scaled) Resolution. Keep Base at your game resolution, Common FPS Values: 60 and Downscale Filter: Lanczos, 36 samples. In Streaming, keep CBR and 6000 Kbps, with Rescale Output Disabled. Click Apply → OK.
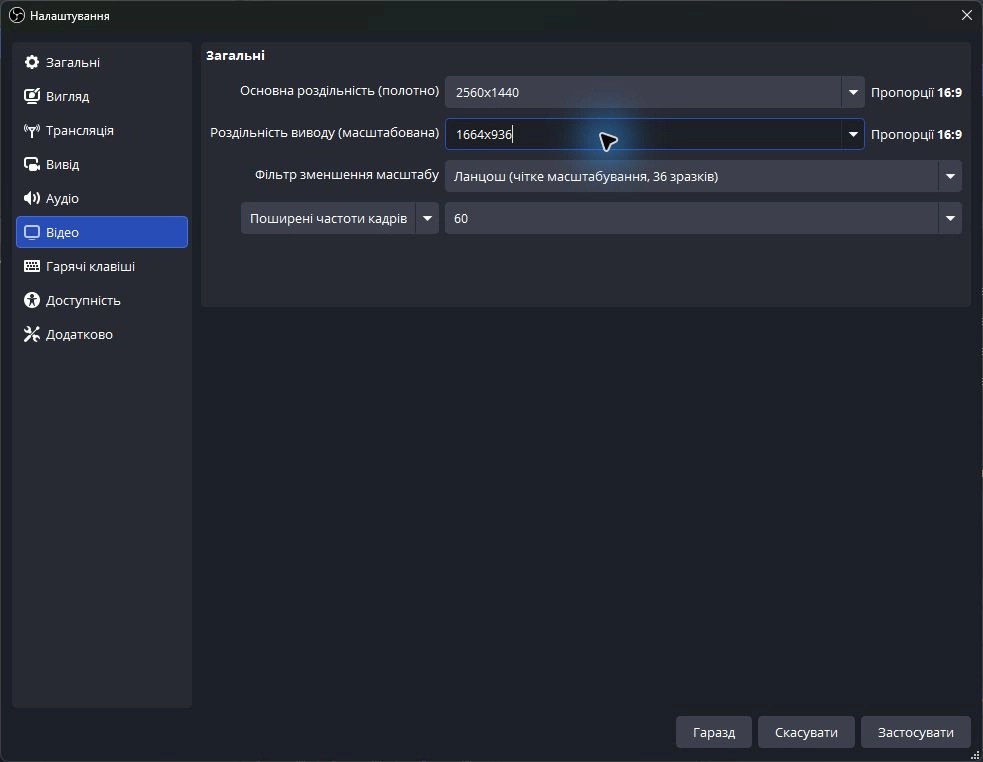
For 936p, change Output Resolution to 1664×936. Keep the canvas at your game resolution.
The 1080p/60 FPS/6000 Kbps profile follows Twitch’s recommendations.
936p at the same bitrate needs the same upload capacity: 6 Mbps of video plus audio. A smaller frame helps with image compression. If Dropped Frames (Network) keeps increasing, check your connection or lower the bitrate. Troubleshooting network frame losses.
936p at the same bitrate needs the same upload capacity: 6 Mbps of video plus audio. A smaller frame helps with image compression. If Dropped Frames (Network) keeps increasing, check your connection or lower the bitrate. Troubleshooting network frame losses.
5. Stream title, category and language
On Twitch, click your avatar → Creator Dashboard → Stream Manager → Edit Stream Info.
- Title: say what you will do. For example: “First stream in Ukrainian: evening World of Tanks battles”.
- Category: select your game; choose Just Chatting for a conversation stream.
- Stream Language: select Ukrainian if that is the language you will speak.
- Tags: add tags that describe the format. Set the language in its separate field.
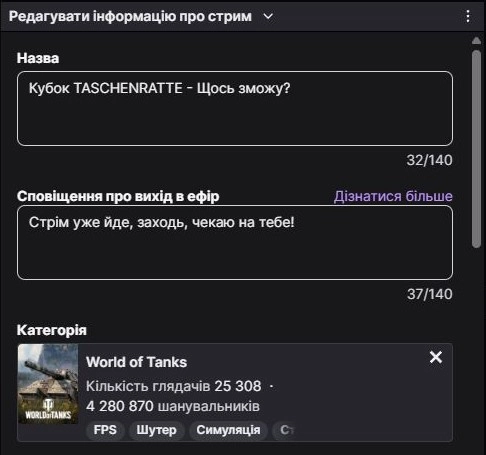
Select your own game. The numbers in the World of Tanks card describe the category, not this channel.
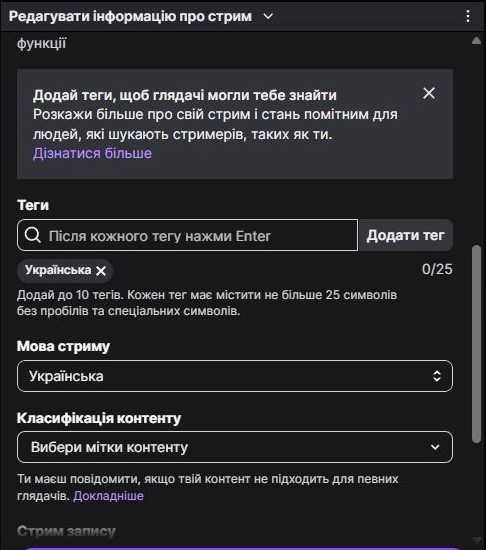
The Stream Language field sits below the tags.
Select any Content Classification Labels required for your broadcast, then click Done. Creator dashboard guide.
Saving Twitch broadcasts
In the creator dashboard, open Settings → Stream → VOD Settings. Enable Store Past Broadcasts before the stream. Always Publish VODs separately controls publication; check your excluded categories too.
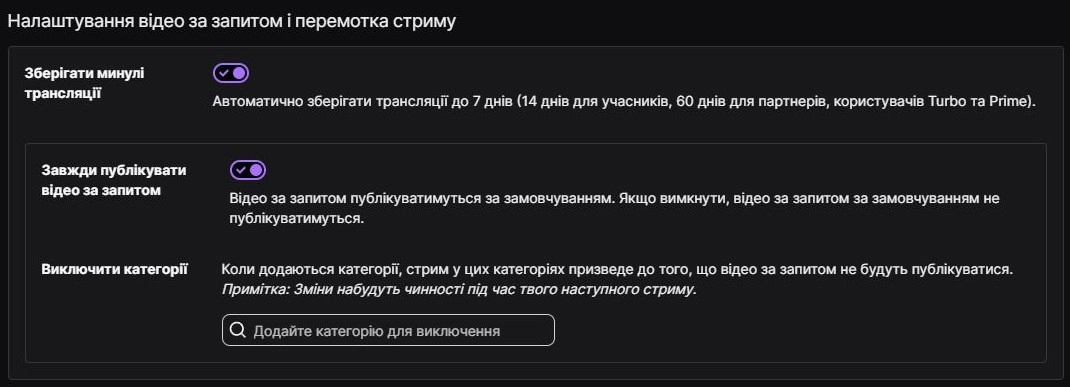
Saving and publishing a broadcast have separate switches.
6. Testing and going live
In Settings → Output → Recording, set Type: Standard, choose a Recording Path, select MKV, Video Encoder: (Use stream encoder) and Audio Track: 1. The recording will use the stream’s video settings; MKV helps preserve a recording if OBS crashes. Click Apply → OK. Local recording settings.
- In OBS, open View → Stats and click Start Recording. Play and speak for 1–2 minutes, then click Stop Recording.
- Open the file from your Recording Path. Check that the game appears, motion has no obvious stutter, your voice is audible over it, and there is no repeated audio or private window in view.
- Check the results in Stats. If Frames Missed due to Rendering Lag or Skipped Frames due to Encoding Lag increased during recording, fix the overload using the list below.
- If the recording looks and sounds right, click Start Streaming. This starts a public broadcast. Open your channel on your phone and check the picture and sound. Listen through headphones to prevent the playback from feeding into your microphone. Check whether Dropped Frames (Network) keeps increasing in OBS.
Use the local recording to check the picture, audio and computer load. Check the connection to Twitch during the broadcast or through Twitch Inspector. To end the broadcast, click Stop Streaming in OBS.
If you add music, check that you have permission to broadcast it and keep it in your VOD. A personal music subscription does not automatically give you that permission. Twitch’s music and copyright rules.
If you add music, check that you have permission to broadcast it and keep it in your VOD. A personal music subscription does not automatically give you that permission. Twitch’s music and copyright rules.
Microphone filters (optional)
Add filters if you hear background noise or volume jumps in your test recording. Right-click the microphone in Audio Mixer → Filters. Use + to add the filters you need in this order:
- Noise Suppression reduces background noise. Choose RNNoise if you hear a fan or hiss in your recording.
- Compressor reduces jumps in voice volume. Start with Ratio: 4:1; Threshold: −18 dB; Attack: 6 ms; Release: 60 ms; Output Gain: 0 dB; Sidechain/Ducking Source: None.
- Limiter limits output peaks. Add it last: Threshold: −6 dB; Release: 60 ms.
These are starting values for a test. Listen to normal speech and a loud phrase. If the compressor leaves your voice too quiet, raise Output Gain and repeat the recording. If an external mixer already processes your voice, check the result before adding the same filters in OBS.
Streaming problems and fixes
- Black screen instead of the game — Open Game Capture properties and check the selected window. If the game is incompatible with this source, try Window Capture with the game in windowed mode.
- No voice or game audio — Check the devices and mute buttons in Audio Mixer. Both sources must use track 1 in Advanced Audio Properties.
- Repeated audio — Mute your own stream playback in the browser. Check for a duplicate microphone, Desktop Audio and Monitor Off. Listen through headphones.
- Voice is only in one headphone — Enable Mono for the microphone in Advanced Audio Properties; keep game audio in stereo.
- Voice distorts or crackles on loud phrases — Reduce device input gain. A limiter cannot repair a signal that clips before reaching OBS.
- Dropped Frames (Network) increases — Pause large downloads, try a wired connection to the router and lower the bitrate.
- Rendering lag increases — Cap the game’s FPS and lower graphics settings to free GPU resources.
- Encoding lag increases — For NVENC, try P5 and Single Pass, then repeat the test. With x264, check whether a hardware H.264 encoder is available. Check load during a 936p recording.
Open View → Stats to see the frame-loss counters. Connection problems and computer overload need different fixes: network troubleshooting, performance troubleshooting.
Frequently asked questions
Can I stream without a camera?
Yes. Game capture and audio are enough for a gaming broadcast. To add a camera later, click Sources → + → Video Capture Device, select it and place the source above the game in the list so that it appears over the gameplay.
How do I stream with OBS on a Mac?
Connect Twitch through Settings → Stream. For the picture, use macOS Screen Capture instead of the Windows-only Game Capture source. On macOS 13 and newer, macOS Screen Capture also supports desktop audio; check your capture setup rather than applying the Windows audio instructions in step 3 directly.
Where is the recording after a stream?
Open Creator Dashboard → Content → Video Producer on Twitch. Ordinary past broadcasts remain available for 7 days, 14 for Affiliates, and 60 for Partners, Prime and Turbo users. If Store Past Broadcasts was disabled before the stream, Twitch cannot recover that recording. VOD guide.
Updated October 11, 2026. These settings are a starting profile: check the picture, audio and load on your own computer before going live.





Discussion
0Sign in to leave a comment on this article.
Sign inIt is quiet here for now. Start the discussion.